BitBucket Pipelines
Something that I recently completed over the weekend was using bitbucket pipelines to automate the building and deployment of my blog. Previously I was building the site on my computer and sftping the files to my hosting server. This worked reasonably well. I had links set up so that I could upload the files to a folder in the home directory and then it would link those files to the /var/www/ folder. It wasn't the best setup because I would have to link the files every time that I added new files. Also, it wasn't really that secure, I felt. Nginx was loading files from a folder in a home directory so it was not that clean. I always wanted to automate the process because it just makes everything easier. I tried using git deploy hooks but it did not really work for me.
Pipelines are something I have wanted to look at because they seem like a cool concept and can be extremely useful. I have used Travis Ci before, but I was never really that good with it. Plus I did not understand it that much. I got the concepts of it before, but I have never really needed something like it offered. I might look at adding it to this project for the experience.
With pipelines, it was easy and there were examples offered by BitBucket to use. I selected the ruby template and make a couple edits and boom, my builds were passing. Adding the deployment feature of it was even easier. They have templates for deploying with multiple Azure, AWS and Google services. I choose to go with SCP copy because is quicker to set up and I don't need to worry about transfer two ways like with SFTP.
To set it up, all you need to add is file called bitbucket-pipelines.yml to your working folder in the repository. My completed config is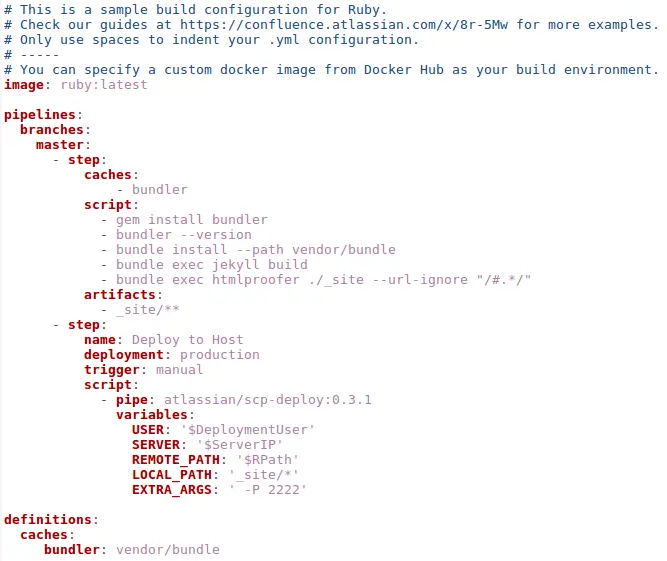
Breaking it down:
There are two steps to it. The first step builds and tests my site while the seconds one deploys it if I manually trigger it. This means that I can run as many builds as I want and it only deploys if it looks good to me. With that all it takes is for me to push to the master branch on bitbucket and it will deploy. A key point of the config is the artifact. It means that where the site is built is passed from the build step to the deploy step. I spend a good amount of time finding ways to do it, before I discovered artifact, which did exactly what I wanted it to do. The definitions section allows me to add the cache of vendor/bundle which makes the build faster (not that it take long currently. It currently takes between 1 minutes and 30 seconds to 2 minutes.Now with caching, I have it down to around 40-50 seconds to build.
I am very happy with how it all turned out. It only took me a couple of hours to learn, deploy and optimize the whole pipeline process. The whole experience has made me want to look into other projects that I have that I can use pipelines with.